Class | Humanoids, CMU, Spring 2018
Challenge | Create a personal agent
Software | Linux OS, Python
Hardware | Raspberry Pi, Google AIY Voice Kit, 9g servo motor, RPi Camera Module
For my class, Humanoid Robotics, I was tasked with creating a personal agent that implemented artificial intelligence. The idea for this project came from wanting to create a humanoid that could interact with my teammates and friends when I am away from my desk at the Entertainment Technology Center. I am very interested in character design for robotics as well as how artificial intelligence can be combined with robotics, so I thought this would be a fun project to do. My end goal would to be have a small robot that represents myself and can engage verbally and perform some physical actions with the people who are using it.
To accomplish the first assignment, I started off with figuring out how to implement facial recognition software into Python. Being totally new to Python, Linux, and Raspberry Pi, it took a bit of time to download the necessary software and libraries. I installed Ubuntu onto my PC and used Python 3 and associated libraries to do this. The major modules I used in this project were OpenCV and a facial recognition module compiled using a source from github:
https://github.com/ageitgey/face_recognition
I was successfully able to get the API from github to work, which included recognizing a person based on their picture, using my webcam PC. (See photo below!)

After this, I moved on to trying to get the Python code to say hello to the person after recognizing them. I recorded myself saying hello to the individuals I am testing this with and imported those files into my script. I used the vlc module and functions to accomplish this. Once I started to implement these mp3 files, I started to have some trouble running the entire script as it would time out/the real-time video would not work. I had to take out the real-time video feed from the webcam which helped my code run a bit faster. Overall, the script is not very efficient and could be improved upon to execute more quickly.
I also tried to implement Snowboy hotword detection so that way my friends could launch the script by saying “Hi Alex”, but had too much trouble trying to compile the module on Ubuntu. After some troubleshooting, it seemed to be an issue with the version of SWIG I was using, but I could not quite figure it out. I will try to implement the hotword detection onto the Raspberry Pi next/will be bypassing the issue since ultimately everything will be on the Raspberry Pi.
Below is a video of my PC version of Alex 2.0:
Moving on to next steps, I implemented it onto the Raspberry Pi using the camera module and Google AIY voice kit I received for this project. Having never worked with a Raspberry Pi before, there was a bit of a learning curve figuring out how it all worked. I started with formatting a 16 GB micro SD card to act as the Pi’s OS.

Next, I used Etcher to flash Raspbian onto the SD card.

Once that was done, I was able to start programming on my Raspberry Pi by setting up the Pi with the micro SD card, a keyboard, a mouse, an ethernet cable, and a power source. I also constructed the Google AIY voice kit box and integrated the Voice HAT board with my Pi. The other two pieces of hardware I used was a 9g servo motor and the RPi Camera Module. Below is a picture of my set-up!

Additionally, I set-up VNC Viewer on both the Raspberry Pi and my PC to remotely access the graphical display. I did this so I didn’t always need to have the Pi set-up at my desk and followed the instructions below to get this working:
https://www.raspberrypi.org/documentation/remote-access/vnc/README.md
Once everything was set up, I used the same face detection API for my PC version with the Pi by following the Raspberry Pi instructions on github. I installed the camera module and got my previous script working. Next, I moved on to tackling voice detection.
One challenge I found in setting up the voice detection system was configuring the Voice HAT drivers. I used the API from github and the instructions from the voice kit below to help install the drivers and modules on my existing Raspberry Pi image:
https://github.com/google/aiyprojects-raspbian/blob/aiyprojects/HACKING.md
https://aiyprojects.withgoogle.com/voice/
I was continuing to get an error: No module named AIY, which then led me to begin troubleshooting by going to the Issues tab on the API. I was able to find a solution on one of the forums by rolling back the repository using the command in the terminal window:
- git checkout c5745ec
From there, another issue I had was using the modules from the voice kit. I remedied this issue by creating a virtual environment within the repository folder I installed onto the Pi by using the command in the terminal window:
- source env/bin/activate
Once I created a virtual environment, I was good to go! The capabilities of voice detection with the voice kit include it being able to recognize words the guest says, which I found fitting for my application. I also took advantage of the button and LED that came with the kit to create an interaction that made sense to the guest. I tested a “Gold Spike” of my interaction flow below:
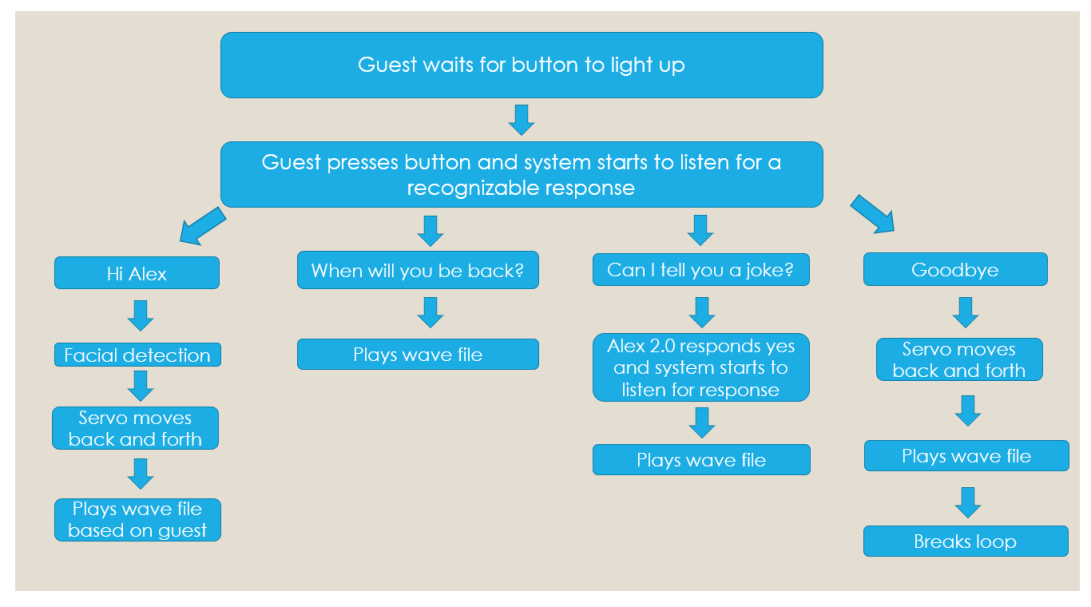
Now that I finished my “Gold Spike” by getting all the components and pipeline I needed to work for one guest, I began to flesh out more interactions for Alex 2.0 to do and added more classmates. I found the following interaction flow to be the most intuitive for the guest and best for my application:
Lastly, I lasercut a cartoon version of myself with the arm separate to attach a servo motor, so the character could wave to the guest. The Voice HAT board that came with the Google AIY kit has several servo motor inputs and there are built in commands to control a servo in the modules, so installing the servo was rather easy by just following the instructions on the Voice Kit website.

Due to a mishap with my micro SD card (note: ALWAYS backup your Raspberry Pi image onto another machine as you are working), I am still working on getting this final version of Alex 2.0 to work with the cartoon character, and will be adding a video demo shortly!
If interested, my scripts for my PC and Raspberry Pi versions of Alex 2.0 can be found below:
This was my first time working with Ubuntu, Linux OS, a Raspberry Pi, utilizing/modifying APIs, and artificial intelligence! I was pretty happy with the end result, and am interested to see what other small projects I can do with the modules I have installed.